
IRIS Clarity Deployment Guide - Installation and configuration guide for PoV’s and Production deployments
Introduction
Congratulations on choosing IRIS Clarity! IRIS Clarity is an AI-enabled voice isolation software which removes background noise from real-time customer calls.
The bi-directional capability of IRIS Clarity means that all participants benefit by making conversations clearer, no matter where they are taking place. To hear an example, please navigate to IRIS Audio and listen to some examples.
This guide provides deployment best practices to ensure the best possible experience for administrators and end users. The IRIS Clarity solution is designed in a way that makes it easy to deploy to your entire organization regardless of the size of your business.
Using scalable installation methods, IRIS can be deployed to your environment within just a few days, and includes a flexible set of administrative tools to ensure your success. The IRIS team is available to help guide you through your deployment of IRIS Clarity should you need any assistance.
Prerequisites
Prior to deployment, and for all agent locations, make sure you have completed the following steps:
- Whitelist - Verify Connectivity to the IRIS Cloud from each end user location
- Verify Desktop Resources - Confirm workstations meet minimum requirements
- Agent Desktop Assessment - Follow these instructions to test IRIS Clarity
Authentication options
Option 1 - Station based licensing
Station based licensing ties the licence to the workstation, and is highly recommended for the initial install and trial. If your sales rep has not provided a station based license please contact them or sales@iris.audio to request this.
Option 2 - User based licensing
User based licensing ties the licence to the user login. When the team is created by the sales team or the self-service process, the team owner will receive an email invitation which will allow them to access the dashboard where they can begin setting up the team and sending out invites to users.
Note: IRIS only supports Microsoft Entra for single sign on at this point in time.
Note: If the team invite does not arrive in your inbox, please check your spam folder and/or company email spam filter.
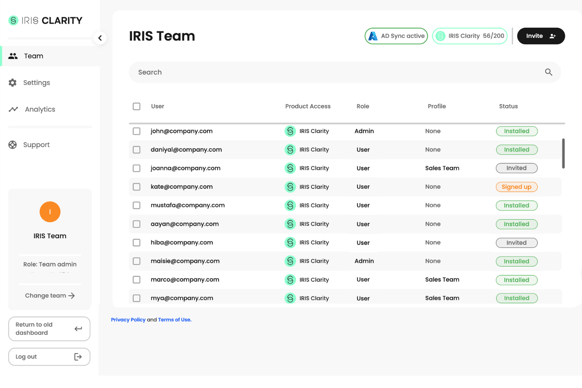
App setup - IT
The IRIS Clarity Web Portal provides the ability to manage IRIS Clarity at scale. This includes team profiles to manage settings, single sign on, agent configuration, download of the application, and analytics. These steps will prepare your environment for a successful deployment while requiring minimum input from the agents.
Station Based Setup - Install the application using station based licenses
- Profile Creation - Configure settings across a user group to deploy at scale.
- Download the Application - Users/administrations can download IRIS Clarity from the dashboard.

- Install the application on the user desktop. This step can be automated with a Bulk Installation for all users
- Station based licensing key should be entered in the License key field during the install on the configuration page. This will license the workstation for IRIS Clarity.

User Based Team Setup - Create the team and manage your users
- Set up the team
- Profile Creation - Configure settings across user groups to deploy at scale
- SSO-Azure (Optional) - Configure Azure single sign on in your environment
- Adding Users
- Entra Sync (AD) - Users can be added by Entra AD sync
- Application Installation - There are two options for installation:
- User Setup - Users can download IRIS Clarity from the dashboard (see Team User Invitation to send invitations)
- Bulk Installation - Administrator can automate the install for all users
- Product Access - Manage access to IRIS Clarity
- Assign Role User - Manage roles of Team Owner, Admin, User
- Deletion - Delete users who need to be removed
Tip: Create one or more profiles as a best practice. This will allow you to pre-configure settings, make configuration changes centrally, lock down your environment, and ensure a consistent experience for your agents.
App setup - Agent
Finding the App on your Computer
- Download and install IRIS Clarity following your local instructions. Once installed, it should launch automatically upon startup. If it doesn’t, you can open it by searching for it via the Start menu or the taskbar search box.
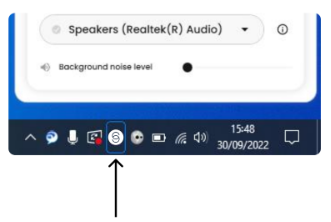
- Once launched, IRIS Clarity will appear in your taskbar overflow tray.
Tip: We highly recommend dragging the IRIS icon from the overflow tray into the system tray.
Setting up the app before your first calls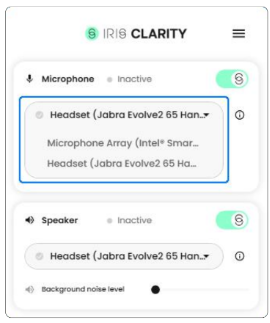
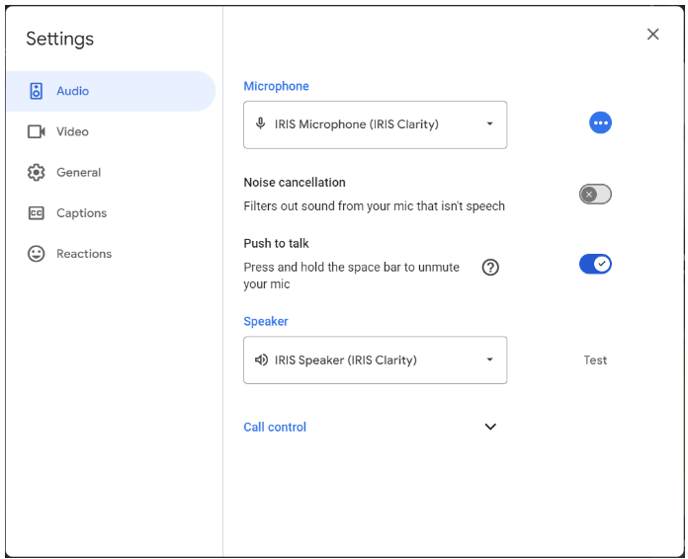
When you open the IRIS Clarity app, you’ll notice a Microphone and a Speaker section.
Microphone manages noise on your side of the call
Speaker manages noise on the other side of the call.
Set both to the device you’re using, probably your headsets (e.g. Jabra), but you can always default back to your System settings (e.g. Default - RealTek).
Now it's time to set up IRIS Clarity on your contact center / online meeting client, e.g. Genesys, Avaya, Microsoft Teams etc.
Setting up your VoIP platform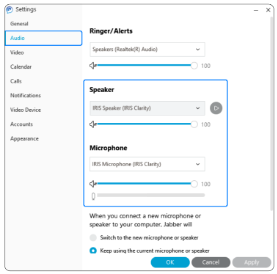
- Go to Settings, usually displayed as a cog icon or similar.
- Find the Audio settings.
- In the Speaker drop-down menu, select “IRIS Speaker (IRIS Clarity)”.
- In the Microphone drop-down menu, select “IRIS Microphone (IRIS Clarity)”.
- Save your settings and make your calls as normal.
Note: Whilst you can select “IRIS Speaker (IRIS Clarity)” in the Ringer/Alerts drop-down menu, we do not recommend you do this, as otherwise IRIS will also eliminate any ringtones and alerts from your calls (as it will consider them as background noise).
Setting up your meeting platform
 platforms like Microsoft Teams, Zoom, Google Meet and more in several ways: before a meeting, as you’re joining a meeting, or during a meeting, and from both desktop applications as well as browsers. The process varies slightly with each platform and method, but mostly looks like this:
- Open Settings — usually via a “More” or “...” button — and look for Devices / Audio devices / Audio settings.
- Change your Speaker and Microphone settings to IRIS Clarity.
- Save your settings and take your meeting as normal.
Note: Some platforms also offer their own noise suppression feature, which you can see further down in the settings window. We recommend setting these to “Off” to avoid conflicting with IRIS technology.
Using IRIS Clarity
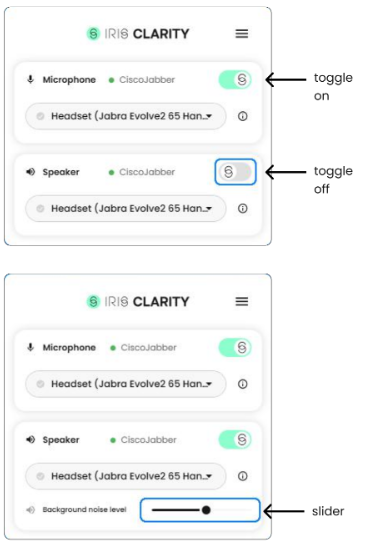
- Once your audio settings are in place, using IRIS Clarity is pretty straightforward. Just toggle the Microphone on to remove background noise from your side of the call, and toggle the Speaker on to remove background noise from the other side of the call.
- If for any reason, you want to let in background noise on one side, for example if someone is on loudspeaker and there are multiple speakers participating, just toggle IRIS Clarity off for that side.
- If you’d like more control over how much background noise you’re letting through on the Speaker side, use the background noise slider to let in more or less noise.
Note: You can only manage this for the Speaker side of the call, i.e. the other side. Your side can only be toggled on or off.
Tip: Keep the app up to date. An an administrator or agent can log into the dashboard and download the latest and greatest app version at any time.
Analytics
As you begin to use the application, team owners and admins will see usage analytics within the account dashboard.
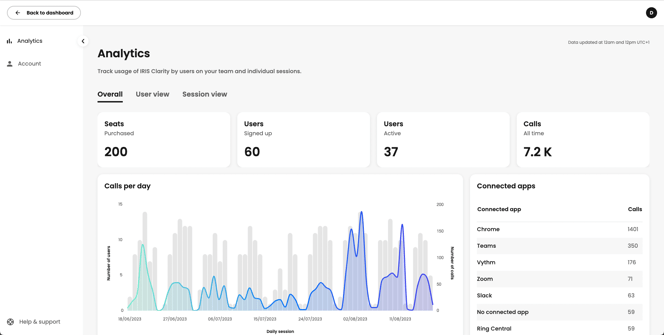
The analytics dashboard presents information on user activity, the number and duration of calls and VOIP platforms and audio devices in use while connected to IRIS clarity as well as the version of the app deployed.
Resources
IRIS Clarity provides a comprehensive set of support and troubleshooting resources at: https://support.iris.audio/knowledge
- IT Technical Documentation
- Troubleshooting
- Whitelisting
- SDK
- Support
Tip: Keep security in mind. Make sure you are applying the correct role to each user to ensure system security.
You are all set up!
Knowledgebase and Support Services
Keep up to date with IRIS Clarity’s new features and updates at the IRIS Knowledgebase. Additionally, you can read our whitepapers and our latest findings at IRIS Research. You can find additional insights and activities on the IRIS Blog. Our goal is to make it as easy as possible for you to remove all noise from your calls and meetings. If you have any questions, concerns, or suggestions, please feel free to let us know at support@iris.clarity.